从零实现一个操作系统-day6

昨天写的内核在屏幕上没有我们输出的东西,今天就来想办法显示点什么

文字的显示

要显示东西就涉及到显卡了,显卡有两种模式,文本模式和图形模式,现在基本都是图形模式用得多,但是我们这个就用文本模式了,毕竟不涉及ui啥的

文本的显示规则

显卡通电后就自动初始化了80\ * 25分辨率的文本模式,即一屏25行,一行80个字符
之前说过内存地址空间不是全部映射到主存的,有一部分映射到外部设备,0xB8000~0xBFFFF就是映射到显卡文本模式的显存的地址空间

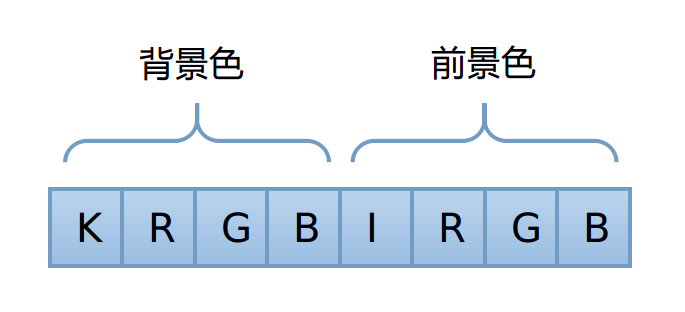
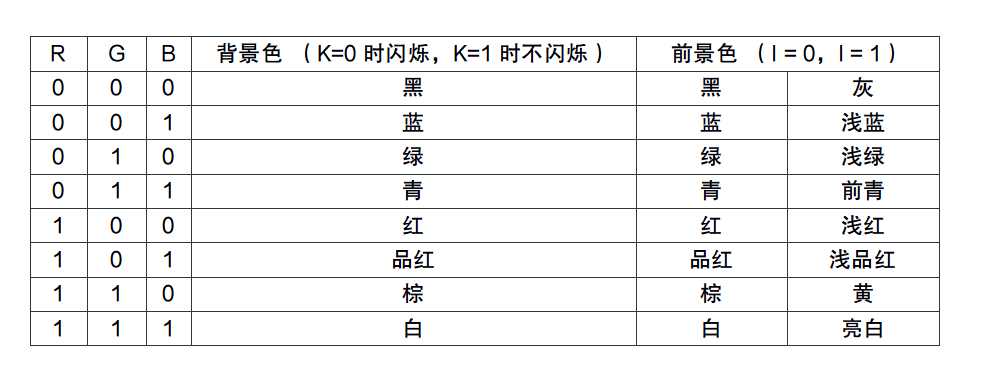
从0xB8000开始,每两个字节对应屏幕上的一个字符,从第一行开始,字符在内存中的存储形式叫内码,第一个字符对应字符的ASCII码,第二个控制字符的颜色等等信息,每一位都有不同的含义,如下图: (图片来自教程)
除了显存之外,显卡还有一些控制单元,这些单元没有映射在cpu寻址的4GB空间里,需要使用in / out命令来读写,这部分寄存器的访问规则是:

  • 通过0x3D4端口来设置寄存器索引,就是要访问哪一个寄存器
  • 通过0x3D5端口来设置寄存器的值

端口读写函数

这些要用in / out命令访问的寄存器用c的代码显然是不行的,只能用汇编实现,这里选择在c里面内嵌汇编代码参考汇编语言和C语言混合编程和内联汇编

libs/common.c

1
2
3
4
5
6
7
8
9
10
11
12
13
14
15
16
17
18
19
20
21
22
#include "common.h"
//往端口写一个字节
inline void outb (uint16_t port, uint8_t value)
{
asm volatile ("outb %1,%0"::"dN"(port), "a"(value));
}

//从端口读一个字节
inline uint8_t inb (uint16_t port)
{
uint8_t ret;
asm volatile ("inb %1,%0":"=a"(ret):"dN"(port));
return ret;
}

//从端口读一个字
inline uint16_t inw (uint16_t port)
{
uint16_t ret;
asm volatile ("inw %1,%0":"=a"(ret):"dN"(port));
return ret;
}

include/common.h

1
2
3
4
5
6
7
8
9
10
11
12
13
#ifndef INCLUDE_COMMON_H_
#define INCLUDE_COMMON_H_
#include "types.h"
//往端口写一个字节
void outb (uint16_t port, uint8_t value);

//从端口读一个字节
uint8_t inb (uint16_t port);

//从端口读一个字
uint16_t intw (uint16_t port);

#endif

头文件前面的那个ifndef和define是为了防止在不同的文件中include了同一个头文件会出现的重复定义错误
函数前面的inline是建议编译器把函数当成内联函数来编译,即在函数的调用处进行代码展开,而不是传统函数调用


颜色定义和屏幕操作函数

是颜色定义的枚举和一些屏幕控制函数的声明

include/console.h

1
2
3
4
5
6
7
8
9
10
11
12
13
14
15
16
17
18
19
20
21
22
23
24
25
26
27
28
29
30
31
32
33
34
35
36
37
38
39
40
41
42
43
44
45
#ifndef INCLUDE_CONSOLE_H_
#define INCLUDE_CONSOLE_H_

#include "types.h"

typedef
enum real_color {
rc_black = 0,
rc_blue = 1,
rc_green = 2,
rc_cyan = 3,
rc_red = 4,
rc_magenta = 5,
rc_brown = 6,
rc_light_grey = 7,
rc_dark_grey = 8,
rc_light_blue = 9,
rc_light_green = 10,
rc_light_cyan = 11,
rc_light_red = 12,
rc_light_magenta = 13,
rc_light_brown = 14, // yellow
rc_white = 15
} real_color_t;

// 清屏操作
void console_clear();

// 屏幕输出一个字符带颜色
void console_putc_color(char c, real_color_t back, real_color_t fore);

// 屏幕打印一个以 \0 结尾的字符串默认黑底白字
void console_write(char *cstr);

// 屏幕打印一个以 \0 结尾的字符串带颜色
void console_write_color(char *cstr, real_color_t back, real_color_t fore);

// 屏幕输出一个十六进制的整型数
void console_write_hex(uint32_t n, real_color_t back, real_color_t fore);

// 屏幕输出一个十进制的整型数
void console_write_dec(uint32_t n, real_color_t back, real_color_t fore);

#endif // INCLUDE_CONSOLE_H_

drivers/console.c

定义一些变量,static修饰代表只在该文件内生效

1
2
3
4
static uint16_t *video_memory = (uint16_t *)0xB8000; //显存的起始地址,每两个字节表示一个字符所以是16位
//屏幕光标的坐标
static uint8_t cursor_x = 0;
static uint8_t cursor_y = 0;

输入光标的移动

1
2
3
4
5
6
7
8
9
10
11
//移动光标的位置
static void move_cursor ()
{
uint16_t cursorLocation = cursor_y * 80 + cursor_x; //一行有80个字符
/*控制光标位置的寄存器为14号和15号寄存器,
* 分别存储位置的高八位和低八位*/
outb(0x3D4, 14); //要设置14号寄存器,即位置信息的高八位
outb(0x3D5, cursorLocation >> 8);
outb(0x3D4, 15); //要设置15号寄存器,即位置信息的低八位
outb(0x3D5, cursorLocation);
}

清屏操作

清屏就是把所有字符用黑底白字的空格填充,然后把光标移动到最前面就行了

1
2
3
4
5
6
7
8
9
10
11
12
void console_clear()
{
uint8_t attribute_byte = (0 << 4) | (15 & 0x0f); //黑底白字
uint16_t blank = 0x20 | (attribute_byte << 8);
int i;
for (i = 0; i < 80 * 25; i++)
{
video_memory[i] = blank;
}
cursor_x = cursor_y = 0;
move_cursor();
}

屏幕滚动

只需要将所有行内容往上移动一格,最后一行填充空格

1
2
3
4
5
6
7
8
9
10
11
12
13
14
15
16
17
18
19
20
21
//屏幕的滚动
static void scroll()
{
int i;
uint8_t attribute_byte = (0 << 4) | (15 & 0x0f); //黑底白字
uint16_t blank = 0x20 | (attribute_byte << 8);
//大于25行就该滚动屏幕了
if (cursor_y >= 25)
{
//米一行向上移动一行
for (i = 0; i < 24 * 80; i++)
{
video_memory[i] = video_memory[i + 80];
}
//最后一行填充空格
for (i = 24 * 80; i < 25 * 80; i++)
video_memory[i] = blank;
//光标向上一行
cursor_y--;
}
}

显示字符串

注意对换行符等等一些符号的处理

1
2
3
4
5
6
7
8
9
10
11
12
13
14
15
16
17
18
19
20
21
22
23
24
25
26
27
28
29
30
31
32
33
34
35
36
37
38
39
40
41
42
43
44
45
46
47
48
49
50
51
52
53
54
55
// 屏幕输出一个字符带颜色
void console_putc_color(char c, real_color_t back, real_color_t fore)
{
//设置字体颜色
uint8_t back_color = (uint8_t) back;
uint8_t fore_color = (uint8_t) fore;
uint8_t attribute_byte = (back_color << 4) | (fore_color & 0x0f);
uint16_t attirbute = attribute_byte << 8;
// 0x08 是退格键的 ASCII 码
// 0x09 是tab 键的 ASCII 码
if (c == 0x08 && cursor_x)
cursor_x--;
else if (c == 0x09)
cursor_x = (cursor_x + 4) & ~(4 - 1); //即当前位置移动4下后的最高位的1所表示的值
else if (c == '\r')
cursor_x = 0;
else if (c == '\n')
{
cursor_x = 0;
cursor_y++;
} else if (c >= ' ')
{
video_memory[cursor_y * 80 + cursor_x] = c | attirbute;
cursor_x++;
}
//一行满了换行
if (cursor_x >= 80)
{
cursor_x = 0;
cursor_y++;
}
// 如果需要的话滚动屏幕显示
scroll();
// 移动硬件的输入光标
move_cursor();
}

// 屏幕打印一个以 \0 结尾的字符串默认黑底白字
void console_write(char *cstr)
{
while (*cstr)
{
console_putc_color(*cstr++, rc_black, rc_white);
}
}

// 屏幕打印一个以 \0 结尾的字符串带颜色
void console_write_color(char *cstr, real_color_t back, real_color_t fore)
{
while (*cstr)
{
console_putc_color(*cstr++, back, fore);
}
}

输出数字

做一下进制转换当字符串输出就行了

1
2
3
4
5
6
7
8
9
10
11
12
13
14
15
16
17
18
19
20
21
22
23
24
25
26
27
28
29
30
31
32
33
34
35
36
37
38
39
40
41
/ 屏幕输出一个十六进制的整型数
void console_write_hex(uint32_t n, real_color_t back, real_color_t fore)
{
uint8_t data[8];
int16_t len = 0;
while (n)
{
data[len++] = n % 16;
n /= 16;
}
len--;
console_putc_color('0', back, fore);
console_putc_color('x', back, fore);
while (len >= 0)
{
if (data[len] < 10)
console_putc_color(data[len] + '0', back, fore);
else
console_putc_color(data[len] - 10 + 'A', back, fore);
len--;
}
}


// 屏幕输出一个十进制的整型数
void console_write_dec(uint32_t n, real_color_t back, real_color_t fore)
{
uint8_t data[10];
int16_t len = 0;
while (n)
{
data[len++] = n % 10;
n /= 10;
}
len--;
while (len >= 0)
{
console_putc_color(data[len] + '0', back, fore);
len--;
}
}

测试

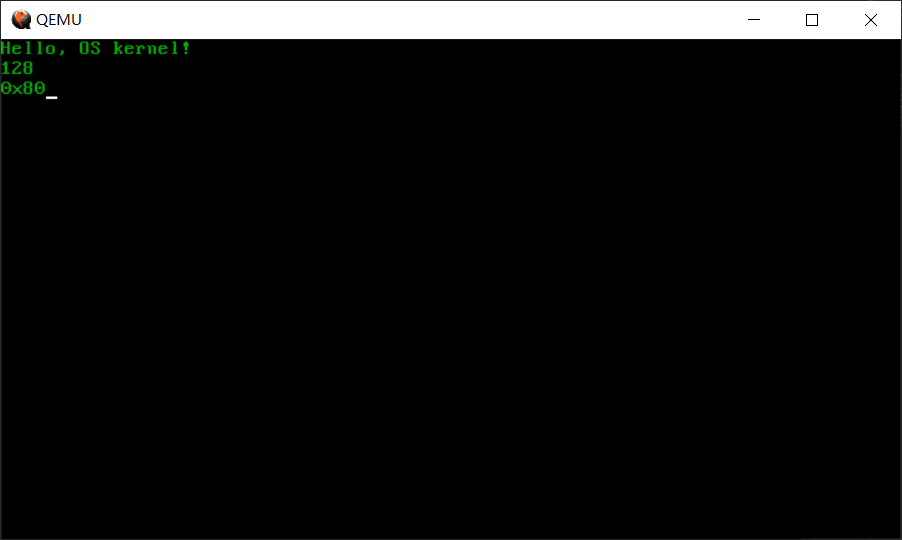
修改一下init / entry.c

1
2
3
4
5
6
7
8
9
10
#include "console.h"
int kern_entry()
{
console_clear();
console_write_color("Hello, OS kernel!\n", rc_black, rc_green);
console_write_dec(128, rc_black, rc_green);
console_putc_color('\n', rc_black, rc_green);
console_write_hex(128, rc_black, rc_green);
return 0;
}
1
2
make
make qemu

最终的成果

本文标题:从零实现一个操作系统-day6

文章作者:

发布时间:2020年04月21日 - 22:04

最后更新:2020年04月23日 - 02:04

原始链接:http://startcraft.cn/post/e91a9319.html

许可协议: 署名-非商业性使用-禁止演绎 4.0 国际 转载请保留原文链接及作者。

-------------The End-------------